Unit 1
|
In unit 1 of the Computer Modeling and Animation class, we learned about some important topics life the history of digital art, digital art careers, hardware and software used for digital art, and intellectual property. Digital art has a long history that begun in the 1900s. Advancements in this field are constantly happening at a rapid pace. Some careers involving digital art are graphic designers, 3d modelers, photographers, user interface designers, and many more. Each of these jobs has hardware that is used for them. Of course, they all require computers of varying degrees of power, and they require other peripherals as well. Intellectual property is important because it gives ownership rights to creators of works, and you wouldn't want people taking your work and using it in ways you don't want them to.
|

Drawing tablets are an important peripheral for many careers in the field of digital art.
|

Toy Story was an important step in the progression of digital art because it was the first full-length 3d animated film.
|
I think the history of digital art is a very interesting topic. It began as just a few pixels lighting up to produce very basic things, and has evolved all the way to photorealistic digital art. I am excited to see how digital art continues progressing as years pass. I think it is likely that virtual reality will progress massively in coming years. I also think the intellectual property unit was very important. I did not know a lot of things we learned in that section of the unit before, so now I know how to make sure I don't infringe on anyone else's intellectual property, which is an important thing to do.
|
While unit 1 may not have been as fun as coming units will be because we didn't get to work hands-on with creative software much in this unit, it contained a lot of important information. This information will be necessary as we go through this class. Now that we have gotten through this part, I am excited to begin the more fun part of this class.
Unit 2: Bitmap Graphics
We learned many photo manipulation tools in Photoshop during this unit. Using all of these combined, we can create just about any basic image we want to. As you can see by the variety of effects above, there are many things we now know how to do within Photoshop to create image composites.
Navigating the interface
To navigate Photoshop, the basic tools are on the left side of the screen. You can right click on them to get more options related to that tool. You can also hover over them to get a small video demonstration of the tool. On the right side of the screen, the primary things are swatches, layers, as well as some options related to layers. To move around the canvas, you can use the hand tool. The shortcut for the hand tool is H. Another way to move around is by holding space and dragging the same way you would with the hand tool. To zoom in and out of the canvas, you can use ctrl + + or ctrl + -, or selecting the zoom tool with Z, and dragging.
Useful tools and effects
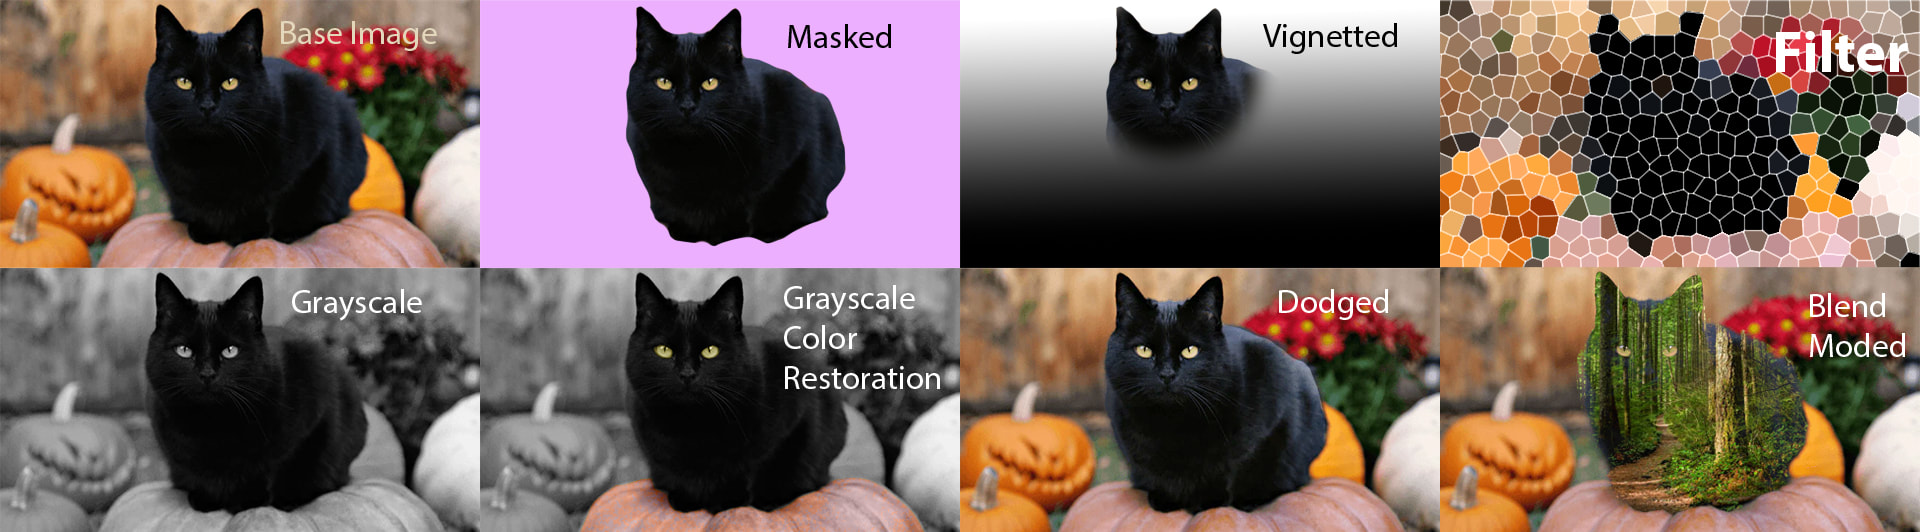
Masking is a very powerful tool. To mask, you could start with selecting a part of the image. The magic wand may be helpful for that. You can then turn on quick mask and paint with black and white to edit the masked area. Then, you can deselect the mask, and add a layer mask. That is how I created the "Masked" image above. You can also create vignettes using feathering on selections. Dodging and burning are some tools that are very useful for adding lighting to objects in a scene. In the "Dodged" image, I used the dodge tool to lighten the cat as if it were in a brighter environment. You can also apply filters to layers, which can do many things. I applied a stained glass filter to create the "Filter" image. Blend modes are also very useful. They can be used for many things. One of the things blend modes can be used for is colorizing or altering the colors on an image. In the "Grayscale color restoration", I took the "Grayscale" image to the left of it, and used blend modes on the eyes and pumpkin to replenish the color. Blend modes can also be used to add cool effects between layers such as in the "Blend Modes" image.
Closing paragraph
I like masking and dodging/burning a lot because they are extremely important for creating compositions of multiple images with lighting that doesn't align. There are many more techniques we learned than those demonstrated above, but the demonstrated ones are some of my favorites. Some other useful tools not touched on are area replacement, layer styles, and adjustment layers.
Image used: “Black Cat Sitting on a Pumpkin.” Desktop Nexus Wallpapers, https://animals.desktopnexus.com/wallpaper/277134/.
Unit 2: Artistic Techniques
|
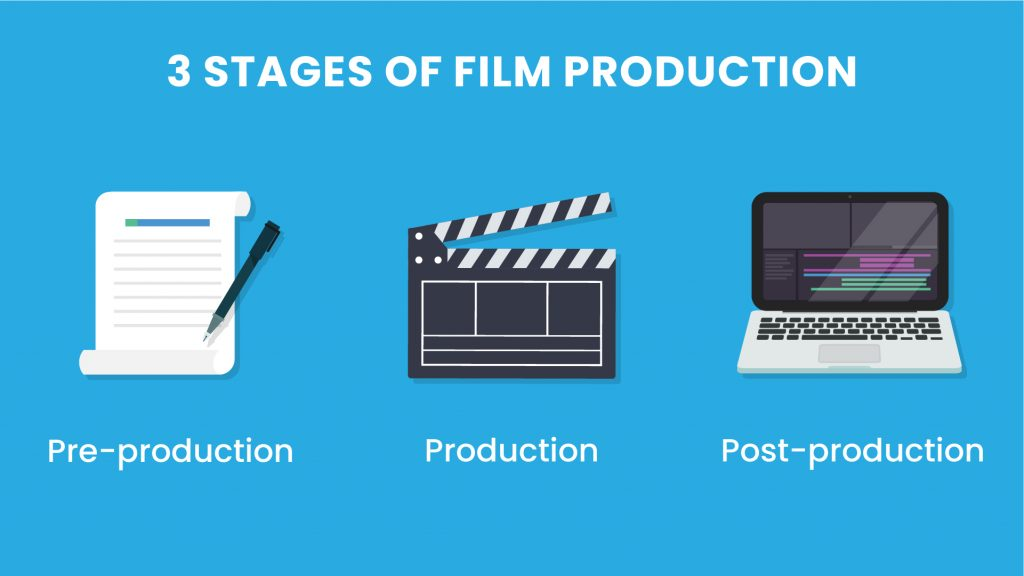
This unit focused on how digital art is created. In the process of creating it, there are multiple stages, the broadest categories of which being preproduction, production, and postproduction. Preproduction is like the planning stage. This is when the idea could be pitched, storyboarded, and planned. Production is the actual making of the final product. Postproduction occurs after the product itself is complete. This could include things like advertising or releasing updates.
|
|

|
All visual art is composed of the elements of design. These elements are line, shape, space, color, size, and texture. These are the most basic forms of the components of a piece. The principles of design address how these elements combine with one another. The principles of design are unity, proportion, rhythm, emphasis, and balance. The principles of design help to tell the consumer how they are supposed to interpret a piece of visual art. Unity is usually more formal, and is often used in informational graphics such as the one I used above while talking about the stages of production. Proportion usually shows 3-dimensionality in 3d or perspective art. Rhythm direct to viewers gaze or attention through a set path. Emphasis tells the viewer what part of a composition is more important than, and deserves more focus than, the rest. Balance shows that multiple parts of an image are equally valuable.
|
|
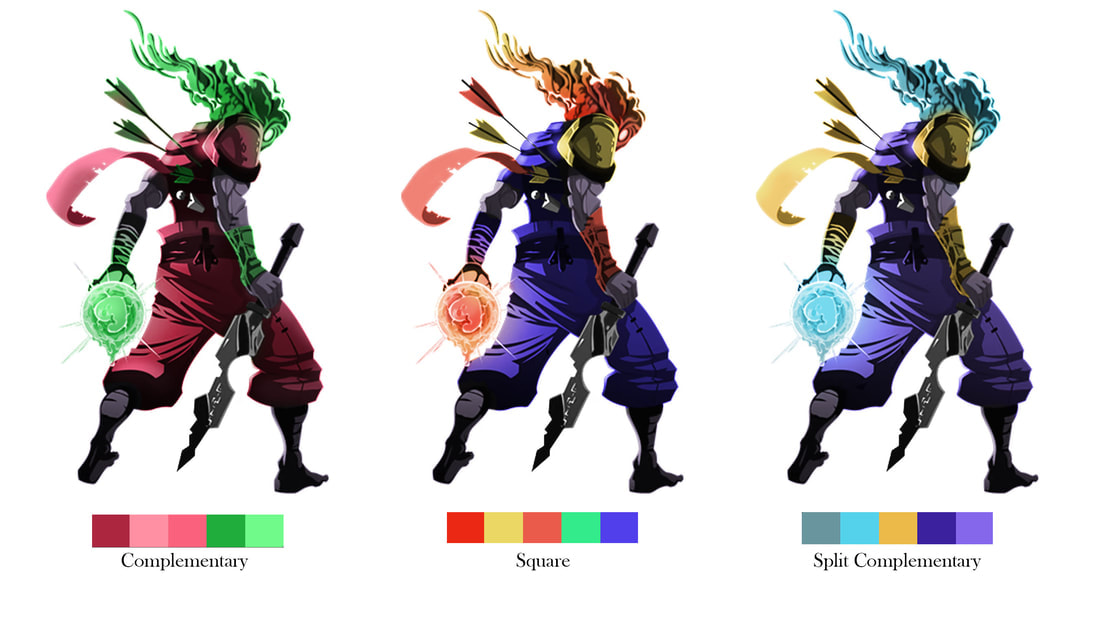
Color theory is the practice of selecting colors that fit together nicely to convey a central idea in a piece. There are many types of palettes of colors such as complementary, split complementary, and square, just to name a few. Different combinations of colors convey different things and have different emotions attached to them. For example, red usually conveys anger, love, or strong emotions, while blue usually conveys sadness or more mellow emotions. Different combinations of colors invoke different emotional responses about a piece, and that is an important thing to consider while creating visual art.
|
|
|
|
The composition techniques for image arrangement are rules about ways to improve the message of images by altering their composition. The rule of simplification states that anything that can be taken out of the image without altering its meaning, should be taken out because it does not contribute. The rule of thirds states that subjects of the image should be placed upon imaginary lines 1/3 of the way to the borders of the image because it creates a more dynamic and visually appealing layout. The rule of odds states that having an odd number of subjects in an image is better than having an even number because it looks more interesting and visually appealing. Perpective is the practice of placing some parts of the image closer to the camera than others, creating depth and three-dimensionality, enhancing the dynamicity and visual appeal of the image, as well as sometimes adding realism.
|
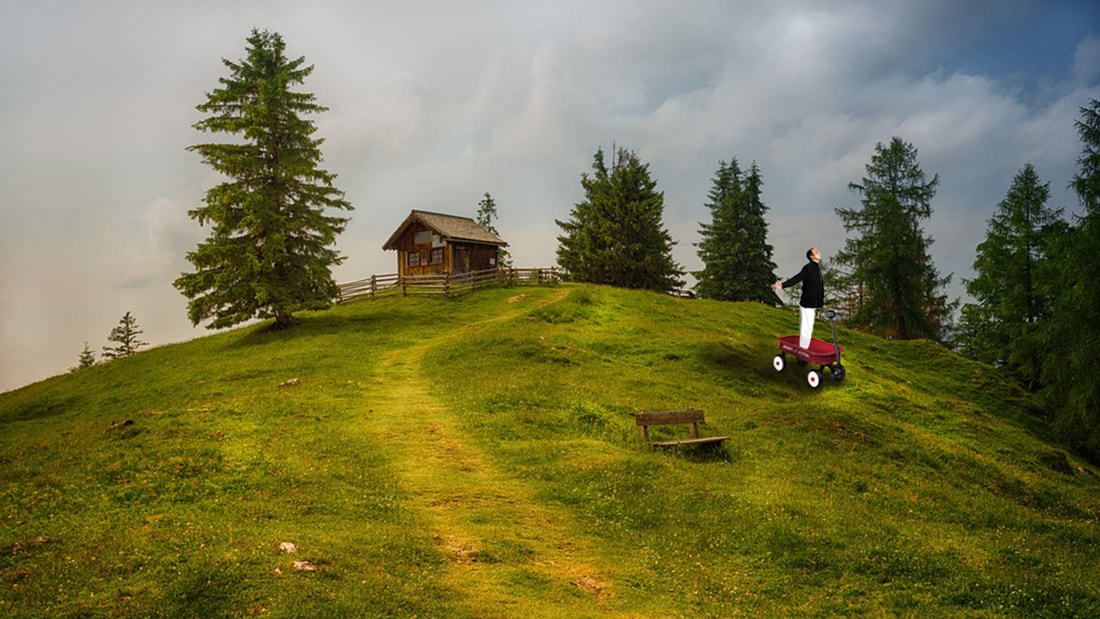
To demonstrate some of these artistic techniques, I created this. This shows many different ones. It uses the rule of thirds because the man in the wagon is 1/3 of the way from the right side of the screen. It also technically demonstrates the rule of odds because there is one main subject of the image. It shows perspective because some elements of the image are closer to the camera while others are farther, creating a sense of depth. There is emphasis placed upon the man in the carriage because of the colors chosen for that part. The majority of the image is green and natural colors, so the bright red, black, and white contrast them, placing emphasis on that part of the image. Also, because the wagon is rolling, it may direct the viewer's eye down the hill, creating rhythm. Texture is demonstrated by organic components of the image such as grass and trees, which have very rough textures. Space and balance are used as well by having mainly positive space on the right half of the image, while there is primarily negative space on the left.
In the future, all of these artistic techniques will help me create more visually appealing images that are more cohesive and nice to look at than things that I would have made before this unit.
Preproduction, Production, Postproduction Image:
Spicer, Steven. “The 3 Stages of the Film Production Process.” FXhome, 13 Sept. 2022, https://fxhome.com/blog/the-3-stages-of-film-production.
Spicer, Steven. “The 3 Stages of the Film Production Process.” FXhome, 13 Sept. 2022, https://fxhome.com/blog/the-3-stages-of-film-production.
Unit 2: Vector Graphics
This segment of unit 2 focused on vector graphics. Vector graphics are composed of mathematical equations like lines and Bezier curves. They are resolution independent, meaning they can be scaled indefinitely, and they usually have smaller file sizes than equivalent bitmap files.
The Illustrator interface is a lot like Photoshop, and many tools in Illustrator carry over from photoshop. Some tools that are new to Illustrator and not in Photoshop are the pen tool, shape builder tool, and mesh tool, just to name a few. The pen tool is used to create lines and Bezier curves, which are both types of paths. The shape builder tool allows shapes to be combined in different ways to create new unique ones. The mesh tool creates a mesh over a shape, which can then be used to apply gradual colors to simulate lighting or 3-dimensionalty.
The Illustrator interface is a lot like Photoshop, and many tools in Illustrator carry over from photoshop. Some tools that are new to Illustrator and not in Photoshop are the pen tool, shape builder tool, and mesh tool, just to name a few. The pen tool is used to create lines and Bezier curves, which are both types of paths. The shape builder tool allows shapes to be combined in different ways to create new unique ones. The mesh tool creates a mesh over a shape, which can then be used to apply gradual colors to simulate lighting or 3-dimensionalty.
|
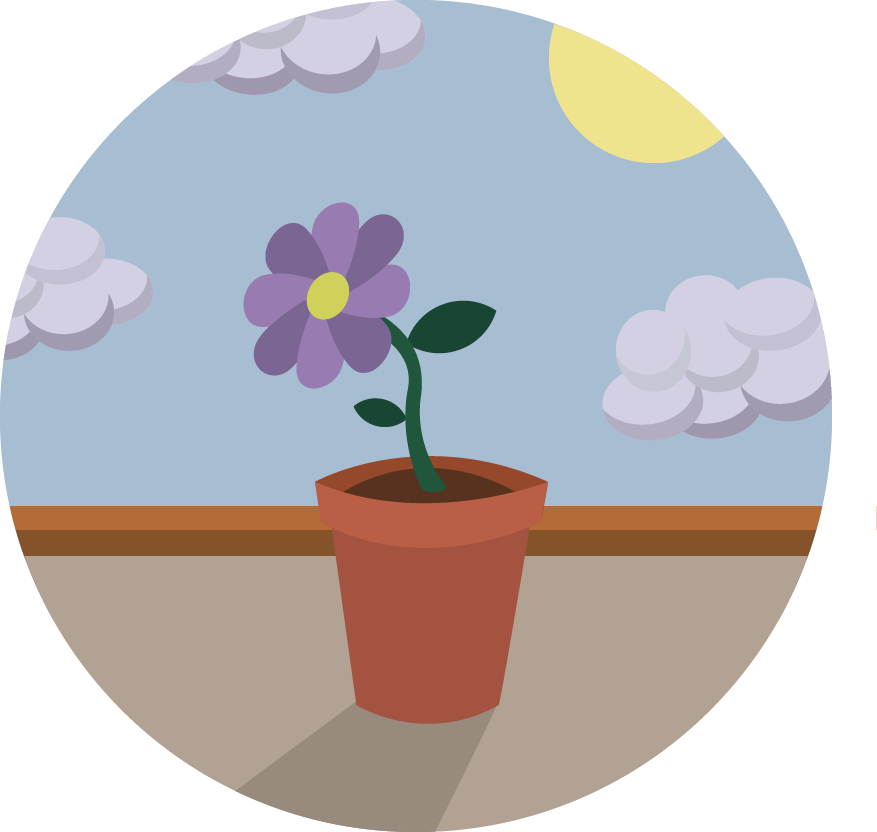
I created the image here on the right in Adobe Illustrator. I started by using the pen tool to create the pot that the flower is in. I then used the pen tool as well as the shape builder tool to make the stem, and the circle tool and the shape builder tool to make the leaves. I made the flower itself using the circle tool for the middle, and the shape builder and pen tools for the petals. I then use the rotation and selection tools to rotate and scale it to be how I wanted it. I made the clouds with the shape builder and circle tools, and made the sun with the circle tool. I then copied the pot, reflected it, and used the selection tool to scale the shadow of the pot. Finally, I used the shape builder tool and a circle to create a circular frame for the graphic. I could have used other tools as well such as the mesh tool or some effects, but I decided to keep this graphic fairly simple.
|
|
Illustrator is great for creating graphics that don't need to be very realistic. I will definitely use it more in the future to create things like this flower picture. Illustrator and vector graphics in general are very different from bitmap ones, and vector graphics have many things that they are really good at. I think unit 2 was very useful overall. I will definitely use what I learned from Photoshop and Illustrator in the future when creating 2d graphics.
Unit 3: Audio/Video
The focus of unit 3 was audio and video editing to produce short films/videos. For this, we used Adobe Premiere Pro, a video editing software. We learned the Premiere interface and how it generally works, the basics of different types of cuts, tools and effects in Premiere, and various other things.
The Premiere Pro interface is very different from the software we have already used, Photoshop and Illustrator because instead of editing images, Premiere edits video. It has four main panels that can be used in video editing. One is used to manage you files, one is used to edit clips before putting them on the timeline, one is used to place all of your clips and effects to create your sequence of video, and the last is used to play back your video. In making the sequence of video, there are lots of things you can do. You can work with multiple layers of video and audio to create scenes with more complexity than if you could use just one layer. You can combine clips with many types of transitions to create the desired effects. For example, you could use no transition effect to create a jump cut, which shows that not much time has passed, and the scene is the same as before, most of the times. You can also add effects such as text, and make it animate, to create captions, credits, or titles.
When capturing video footage to use in Premiere, and most video edits, you usually want to film in landscape mode, to capture a wider scene. You also want cuts to be filmed from different enough camera angles, or else the cuts can look unnecessary. Subtitles can be created very easily in Premiere. To do this, you create a transcript, and Premiere will automatically try to detect what is being said. You can then go in and fix any errors it made manually. After that, you can simply export the video with burnt in captions, and that is all you have to do! Animating things can be done with keyframes with different positions, or with some transition effects like push, depending on what kind of effect you want to accomplish.
Now that I know how to use Premiere Pro, I will definitely use it whenever I need to do video editing now. It can be very simple, but it also has lots of complexity and depth, which can be used if needed. Premiere Pro is going to be my go-to video editing software of choice from now on, for both simple and complex tasks.
Unit 5: 3D Modeling
Unit 5 of the Computer Modeling and Animation course was focused on 3d modeling. We started by learning about Cartesian coordinates, which is a coordinate system made up of a set of numbers used to determine an item's position relative to the origin of the scene. In 3d, there are three numbers, each representing the position along an axis, those being X, Y, and Z. In 3d modeling software, X is almost always a horizontal axis, and Y and Z are sometimes horizontal and sometimes vertical, depending on the software.
|
The 3ds Max interface is very different from the interfaces of previous software we have used. This is because unlike all of the other software used in this class, 3ds Max is not an Adobe product. Also, the third dimension used in this software adds much more complexity, which the interface must accommodate for. There are still some similarities between 3ds Max and Adobe software. For example, in 3ds Max, there are still menus at the top of the screen called File, Edit, Tools, and Help, which have similar properties. Another similarity is the way that the actual product you're working on is in the middle of the screen with options surrounding it on the top, right, bottom, and left. Beyond that, there are not many similarities between the interface here and in previous software.
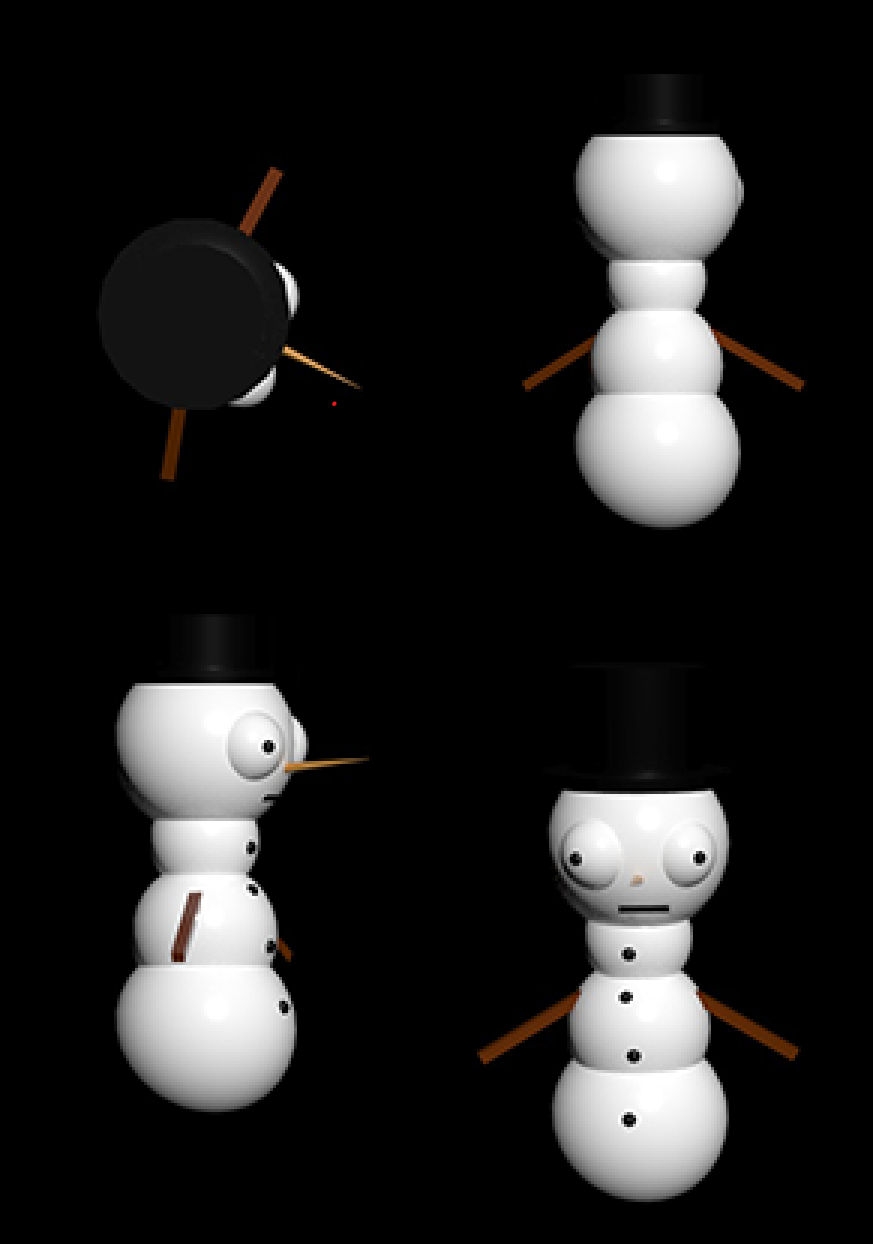
Primitives are basic 3d objects such as boxes, spheres, cylinders, and more. They have a lot of power to create basic models. For example, by combining some spheres, some cylinders, and a pyramid, you can make a basic snowman. This is called box modeling. |
|
|
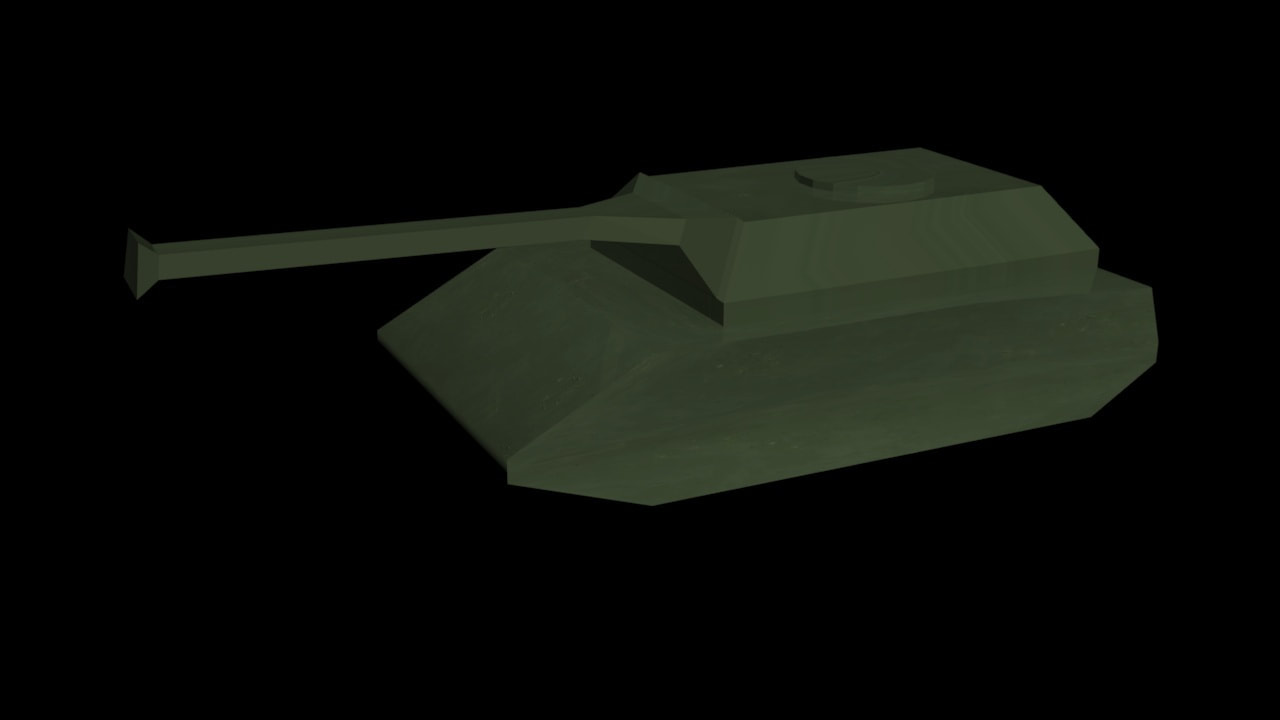
Surface Modeling is one step beyond box modeling. With box modeling, you combine primitives to create a model, but with surface modeling, you modify the primitives themselves. You can edit their individual vertices, edges, or faces in 3ds Max to do this. Using box modeling, you can extrude new sides, bevel new sides, and much more. With box modeling, I created the tank on the left out of what was originally just a single primitive cube.
|
|
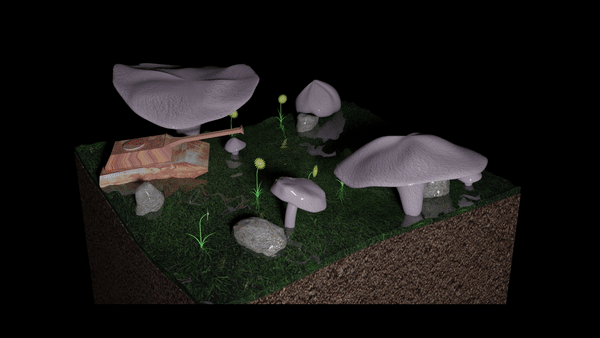
Modifiers can also be added to objects to, as the name states, modify them. There are tons of modifiers that can do a lot of things, but some of the ones I used were noise, mesh smoothing, bevel, twist, and bend. For example, the mushrooms in this scene started with cylinder primitives. Then, I used surface modeling to make the top larger than the stem, used a bevel modifier to make them curved, added a noise modifier for texture, smoothed the noise with a mesh smooth modifier, and then bent some of them with the bend modifier.
|
|
|
|
Lights and cameras can be added to scenes to do other visually interesting things. There are multiple types of lights that all cast light in different shapes. For example, there are spotlights which produce light in a cone shape, target spotlights, which point at a separate target object, and skylights. These lights can also be animated and have their colors changes to create unique effects. For example, in the video attached, spotlights were linked to the front of the car to look like its headlights.
Cameras can also be added to scenes so that, when the video is rendered, the camera is used as a point to render from. This is even more powerful when combined with animation, so you can have a camera that is moving in an animated scene. In the attached video, a camera was linked to the car and placed behind it, then the animation was rendered from that camera. |
Animation can also be used in 3ds Max. This is done through the use of keyframes and automatic tweening. Automatic keyframes can be used too. You can enable automatic keyframes, drag the playhead to the correct spot on the timeline, and move objects to their correct positions, and the tweening is automatically done. You can also animate objects in other ways. For example, you can make one object follow a path, which is how I made the car in the previous attachment follow the path of the road without having to manually get it to do that.
This cheese one a plate scene was created using the tools described above and a few more. The cheese is made out of a box primitive with a taper modifier to make it more triangular. Then, I added a bunch of sphere primitives around it, and used boolean compound objects to get rid of all spots where the shapes overlapped, to produce holes. The plate was made in a similar way. I took a cylinder, tapered it, copied it up a bit, and removed the overlap between the original and the copy. The knife is made with a box primitive for the handle and a cylinder primitive for the blade. I taped the edge of the blade, and used compound boolean objects to cut out half of the oval. I then animated the scene to make the plate spin, and rendered it.
Unit 5 has probably been my favorite unit because I enjoy working in three dimensions. I think some of the most useful things learned in this unit are surface modeling, because that allows you to create just about anything given enough time, and modifiers, which make doing many things significantly easier. This impacts how I will use digital art in the future by essentially adding a whole new medium for it. Also, having modeled some basic scenes makes it much easier to appreciate the work that goes into the ridiculously detailed scenes in games and movies.
